To connect social media accounts that you are the owner or admin of please follow the below steps.
1. Login to the Fetch platform.
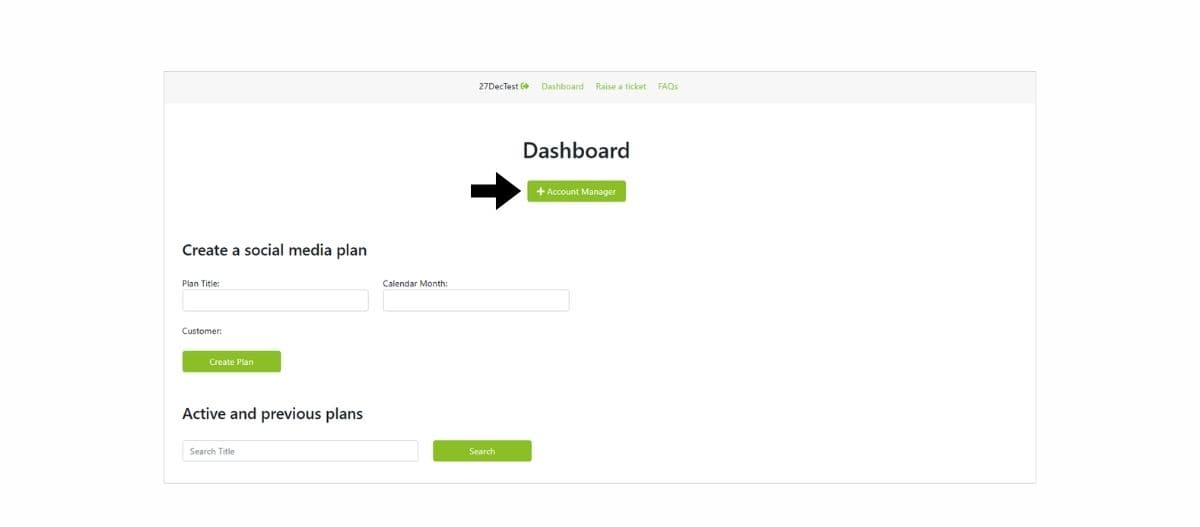
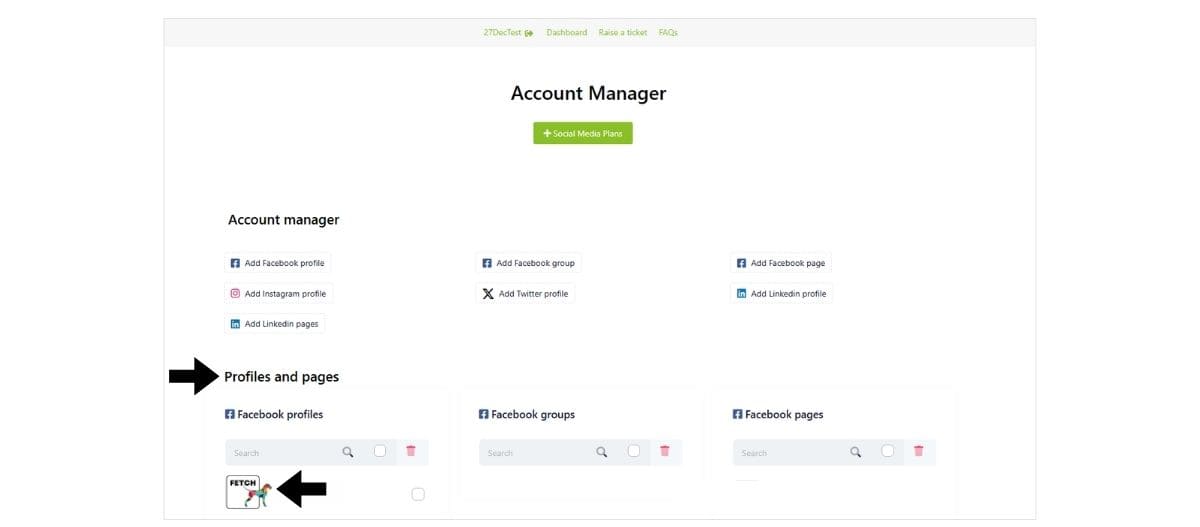
2. When taken to the homepage. Click on the green button called ‘Account Manager’.
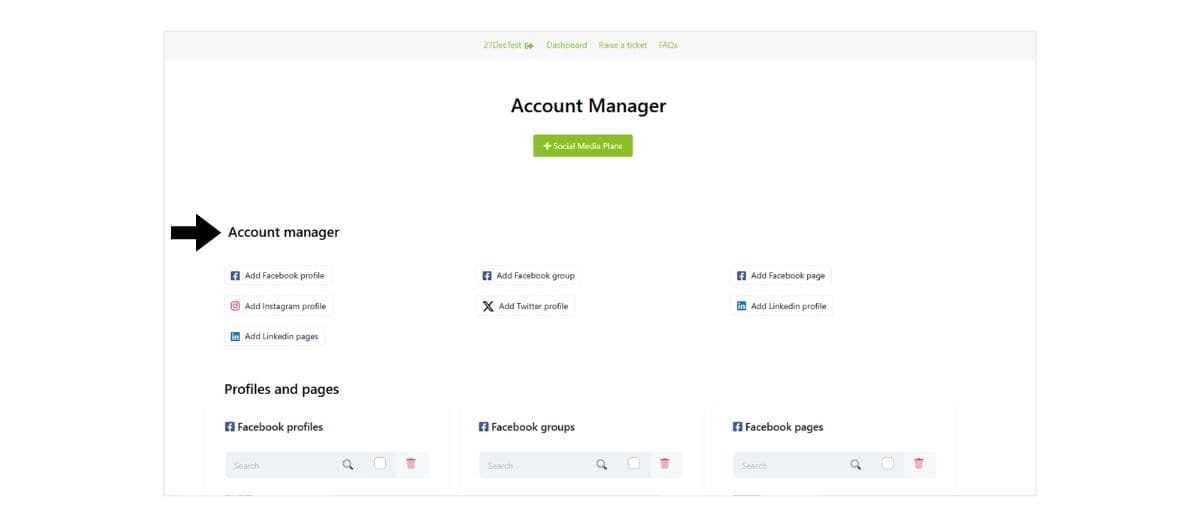
3. When the page loads, under the sub-heading ‘Account Manager’ you will see a number of buttons. Each button allows you to connect your social media account(s) to the platform.
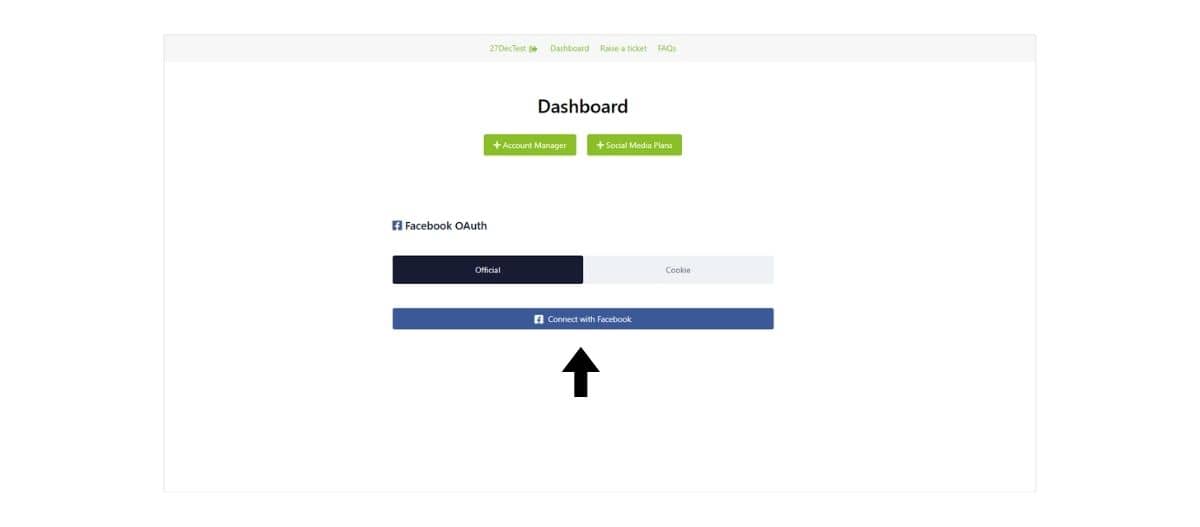
4. Click on the social media account you want to connect and follow the instructions.
5. When connected you will be returned to a confirmation page.
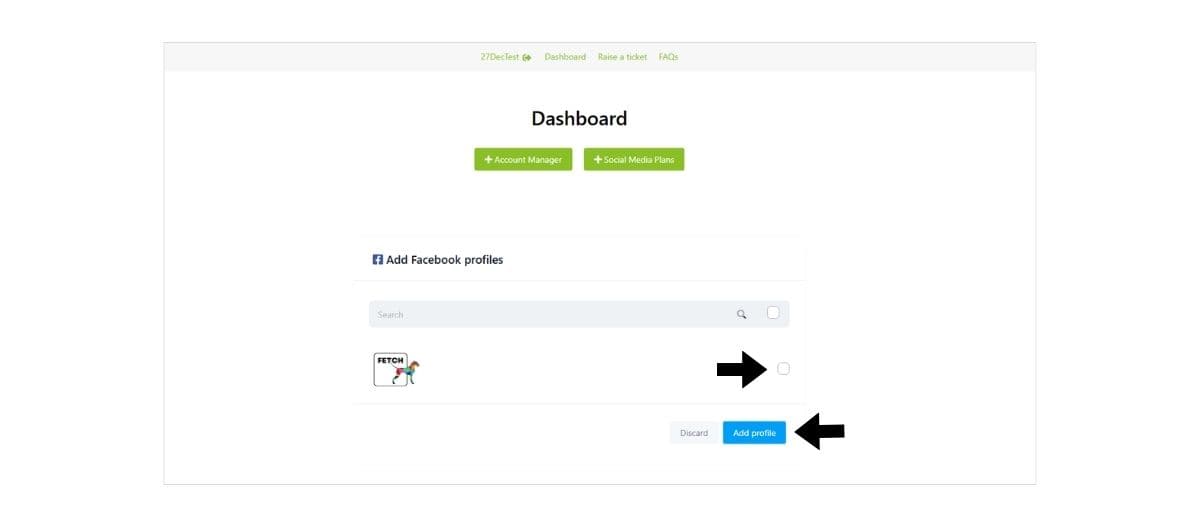
6. Click on the ‘box’ to the right of where the account information is displayed. And then click on the button called ‘Add Profile’.
The page should then show a ‘Success’ banner at which point you will automatically be taken back to the ‘Account Manager’ homepage.
The social media account that you have added will be shown under the ‘Profiles and pages’ section.
To add more social media accounts, repeat the above steps.
See below for more.
Need help? Click the Raise a Ticket link in the main navigation bar of your Fetch platform account (visible when logged in), and we’ll respond asap.
When you login to the content generator you will be taken to your account homepage. Here you can create a new social media plan by giving it a title and selecting the calendar month it relates to. Currently, you are not able to produce more than two social media plans in any one month period.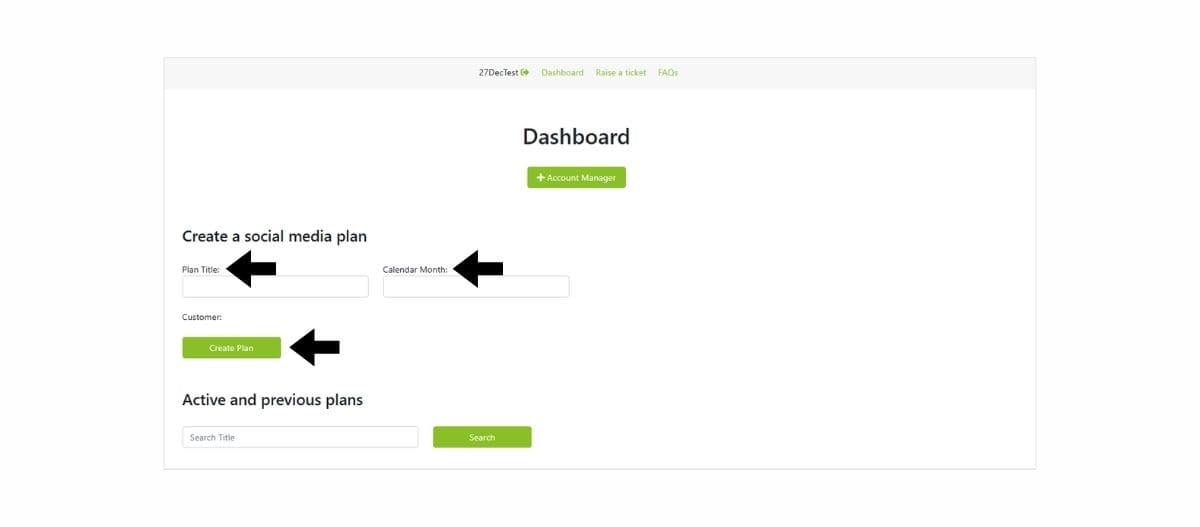
Need help? Click the Raise a Ticket link in the main navigation bar of your Fetch platform account (visible when logged in), and we’ll respond asap.
The active and previous plans section of your dashboard contains all the social media plans that you have created over time. These plans can be viewed in full at any time as well as downloaded as required.
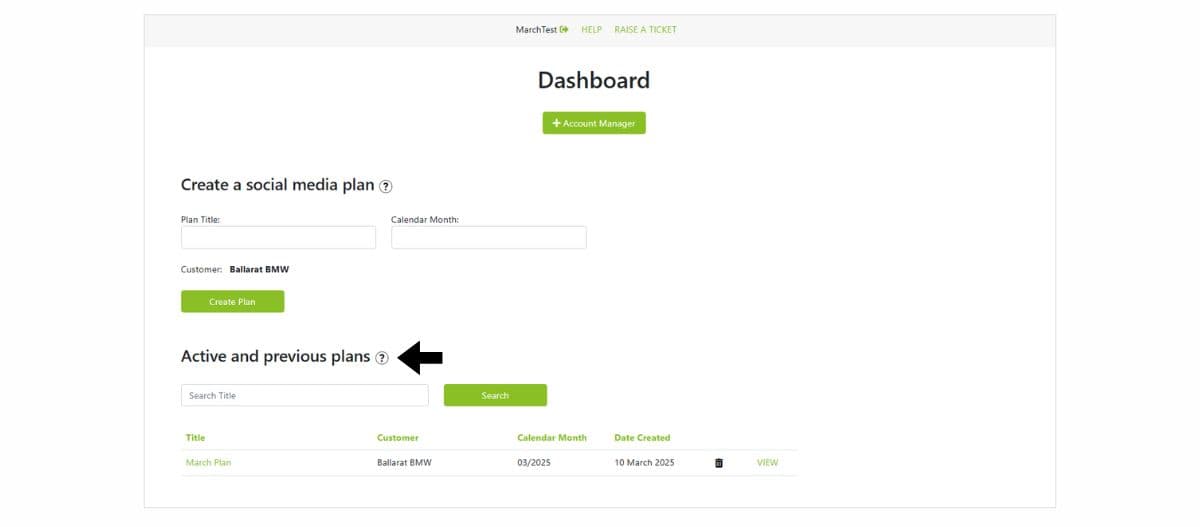
If you wish to delete any social media plans as any time, simply click on the ‘trash can’ icon that is visible. Please note that once plans are deleted they are not able to be recovered.
Need help? Click the Raise a Ticket link in the main navigation bar of your Fetch platform account (visible when logged in), and we’ll respond asap.
Generating posts for your social media plan is easy with our content generator.
Once you have created your social media plan you will be taken to the plan homepage. To start building your social media plan click on the button labelled ‘Generate new post(s)’.
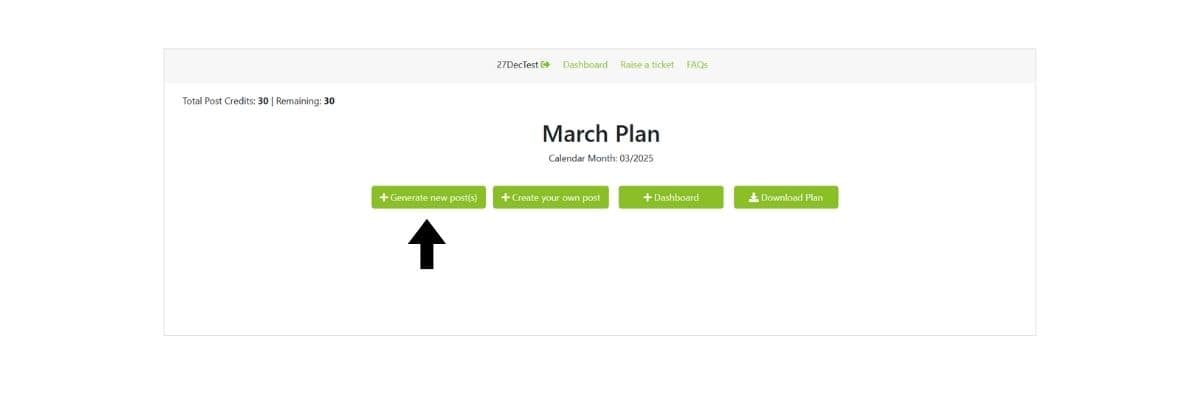 A pop-up screen will open and display a range of options you can use to build you social media plan.
The dotted-line area shown in the below image is the main tool used for creating your bespoke social media plan.
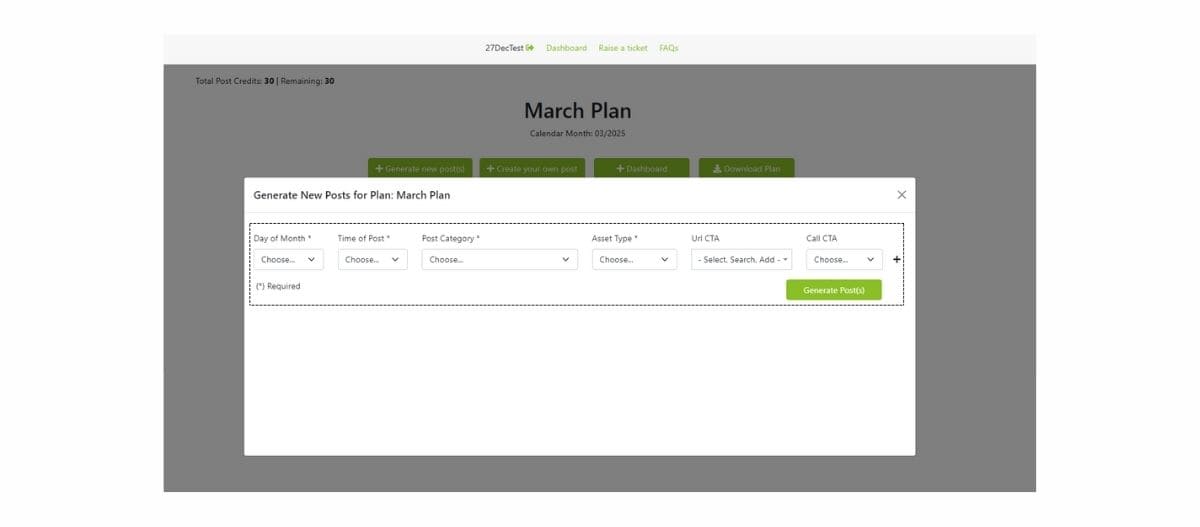 Below is an explanation of each key element.
Day of month
When you login to the content generator, to get started you need to create a social media plan by month. The days and date of the month you select are shown in the ‘Day of month’ dropdown. This field is compulsory for each post you create.
Time of post
This function allows you to set the time at which you want the post to be published. This field is compulsory for each post you create.
Post Category
This dropdown menu contains all the categories available to you. Each category that is represented has pre-written social media posts available, as well as media assets – images and videos. Simply select the category you want to generate a post for.
This field is compulsory for each post you create.
Asset type
For each social media post that the content generator creates for you, a matching image and/or video asset is displayed. Using the ‘Asset type’ dropdown menu you can decide what you want to generate. Image only, Video only or Image or Video.
This field is compulsory for each post you create.
Url CTA
There are two ‘call to action’ functions that you can utilise when developing posts for your social media plan. The first is called Url CTA.
Using the company website address you gave us when registering, our platform searches for and copies the url’s of your company website pages and displays the results in your Url CTA dropdown.
Using the dropdown to find a Url.
To find the Url that you want to use with your social media post you can either click to open the dropdown and then scroll to the required page OR search the list by typing in the Url CTA box.
What happens if the Url you want isn’t there?
Depending on your company website our technology may not be able to gather and display all Url’s. This means that not every page of your website may be shown in the Url CTA dropdown list.
However, if the Url you want to use isn’t present, you can add your own bespoke Url by simply typing it out in the Url CTA box. The Url you enter will appear as you have written it in your social media post.
The Url CTA field is not compulsory. If you do not want to have a Url CTA added to your social media post please leave this option blank.
Call CTA
The second ‘call to action’ function that you can utilise when developing posts for your social media plan is Call CTA.
The company contact telephone number you gave us when registering for an account is available to use as your Call CTA. If you choose to add a Call CTA to any of the social media posts that you create it will automatically be added to the post when our system generates it for you.
This field is not compulsory. If you do not want to have a Call CTA added to your social media post please leave this option blank.
CTA Round-up
You can, for each social media post:
Have no CTA.
Have a Url CTA but no Call CTA.
Have a Url CTA and Call CTA.
–
Additional functions
The ‘+’ sign function
When you are developing each social media plan it is likely that you will want to have multiple posts. The ‘+’ sign function that is present at the end of each ‘Generate new post(s)’ row allows you to develop and add in another post to your plan.

Once you have completed the social media plans you want to include, simply click on the ‘Generate post(s) button and the platform will generate the posts you have selected.
Generate post(s) button
By clicking this button the post(s) you have selected will appear on your plan.
Delete posts
To delete social media posts rows or to remove posts from your plan once published you can simply click on the ‘trash can’ that is displayed.
If you wish to delete a social media post when viewing your main plan, simply click on the ‘delete’ link and it will be removed.
Need help? Click the Raise a Ticket link in the main navigation bar of your Fetch platform account (visible when logged in), and we’ll respond asap.
Currently, each social media plan that you create can have a maximum of 30 separate posts in it.
Need help? Click the Raise a Ticket link in the main navigation bar of your Fetch platform account (visible when logged in), and we’ll respond asap.
For each social media plan you develop we give users 30 Post Credits. Your Post Credits can be seen in the top left hand corner of your social media plan page.
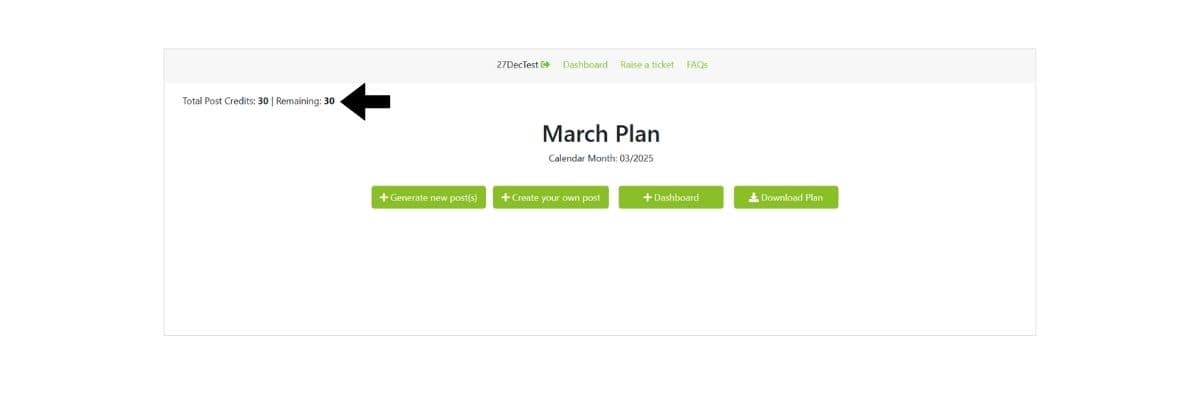 Certain actions that you do when developing a social media plan will use a Post Credit. These actions are: Refresh a post image; Refresh a video; Refresh copy; Delete a post then add another post in it’s place.
Each time a Post Credit is used, the counter will reduce by 1 unit until it reaches zero. When this happens you will not be able to perform any more of the actions listed above.
Need help? Click the Raise a Ticket link in the main navigation bar of your Fetch platform account (visible when logged in), and we’ll respond asap.
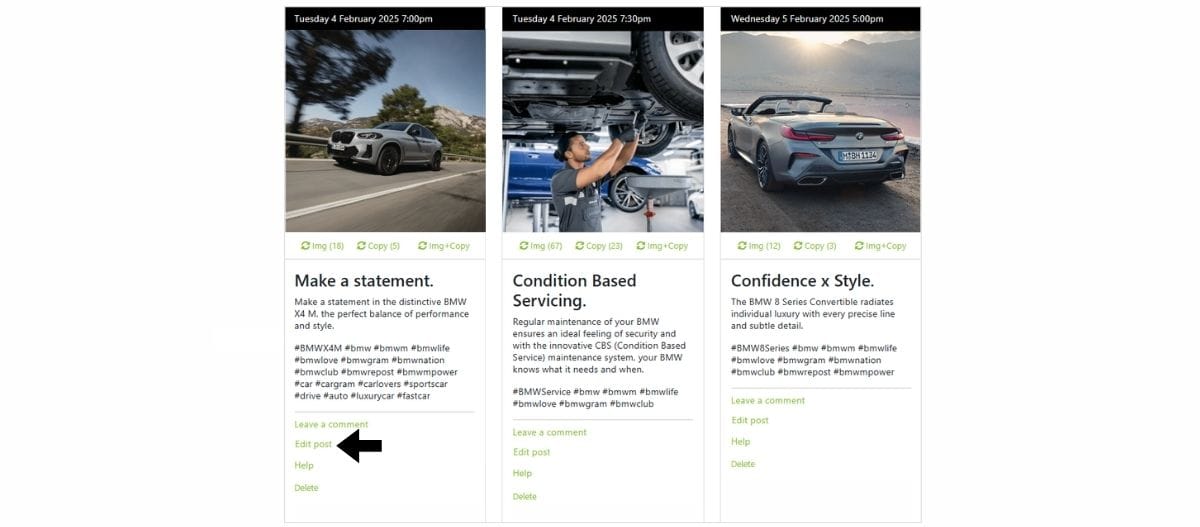
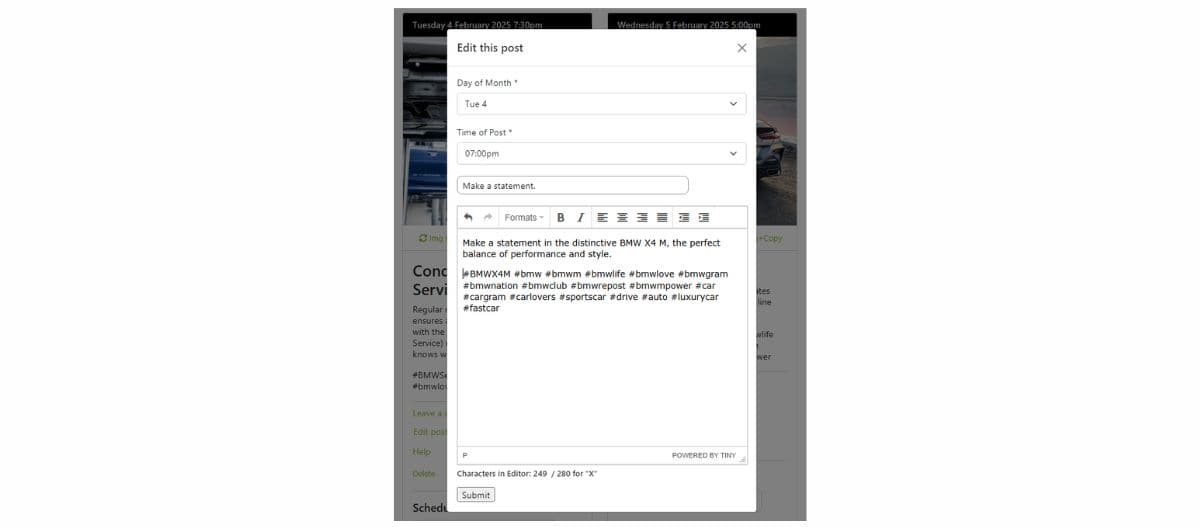
Editing a social media post once it appears in your plan is easy. Simply navigate to the ‘edit’ function – example shown below – click on the link. Make your required edits and hit the save button.
Need help? Click the Raise a Ticket link in the main navigation bar of your Fetch platform account (visible when logged in), and we’ll respond asap.
Deleting a social media post can be done in two ways.
The first is to delete the entry via the ‘Generate new post(s)’ function. This can be accessed by clicking on the relevant button – see below:
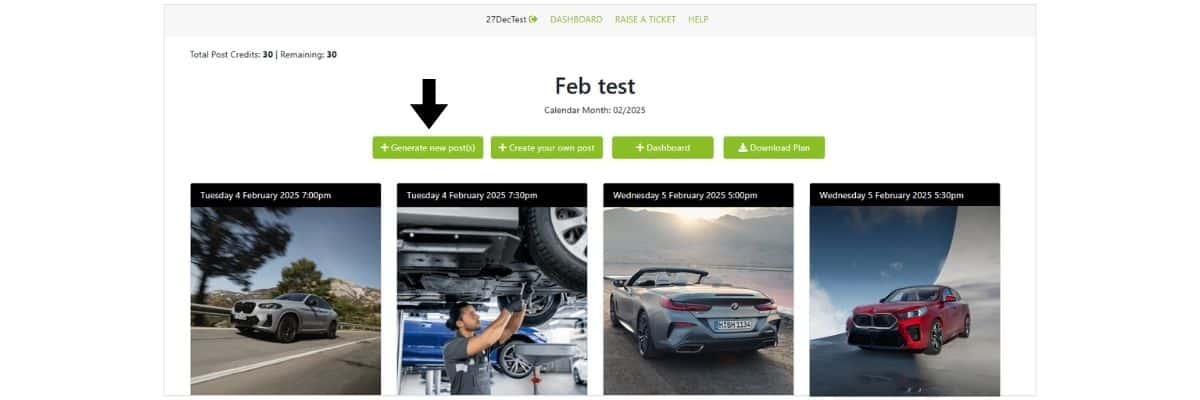
A pop-up will appear when the button is clicked displaying the social media posts that you have in your plan. To delete any of these posts or rows, just look for the ‘trashcan’ icon and click on the relevant one to remove.

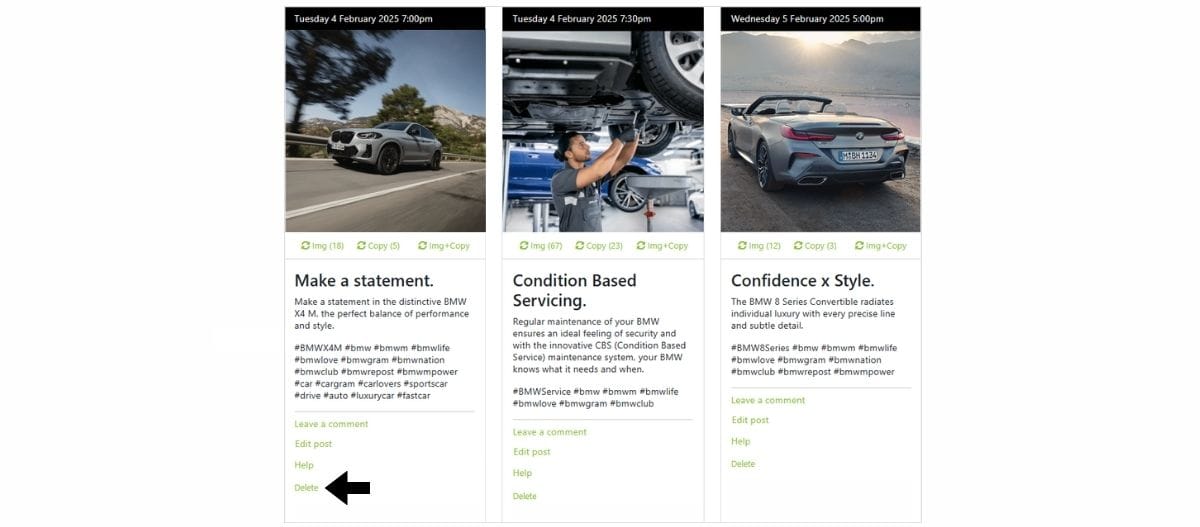
The second option is to delete the post from the social media plan page. To do this, simply look for the ‘delete’ option at the bottom of each post and click the link to remove. Once deleted the post will also be removed from the ‘Generate new post(s)’ section.
Need help? Click the Raise a Ticket link in the main navigation bar of your Fetch platform account (visible when logged in), and we’ll respond asap.
When you create a social media post via the ‘Generate New Post’ functionality the post will appear on the main plan.
 For each post there is a section called ‘Schedule Post’. When you click on the dropdown you will be able to select which social media accounts you want the post in question to be sent to. Simply tick all the boxes that apply.
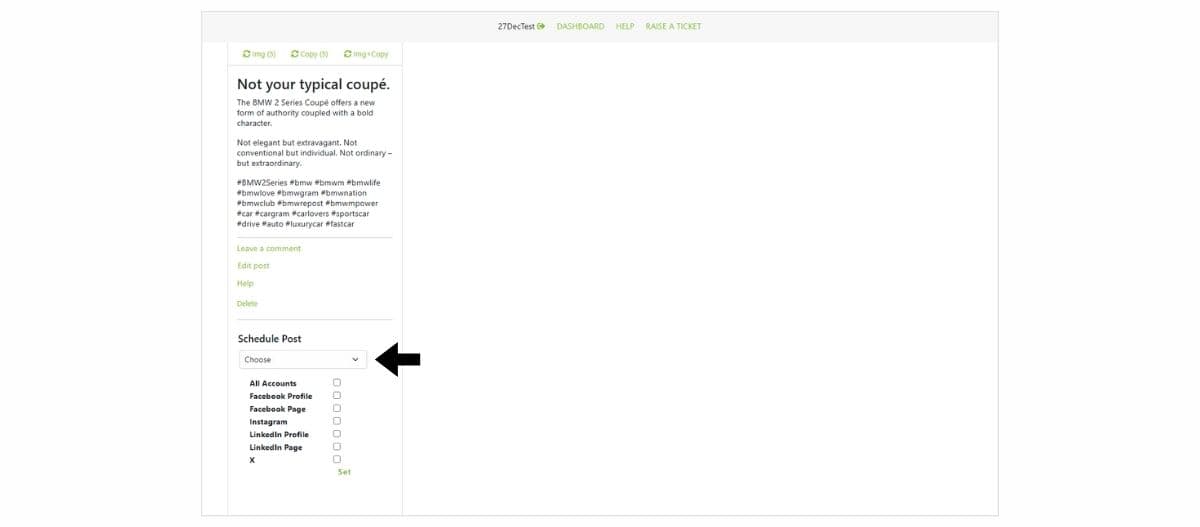
*Please note: You need to ensure that for each social media channel you want to publish to, you have connected a corresponding social media account to the platform, via the ‘Account Manager’ function.
Once you have selected the social media channels that you want a post to be published to, you will be asked if you wish to personalise the post for each of the channels you have selected.
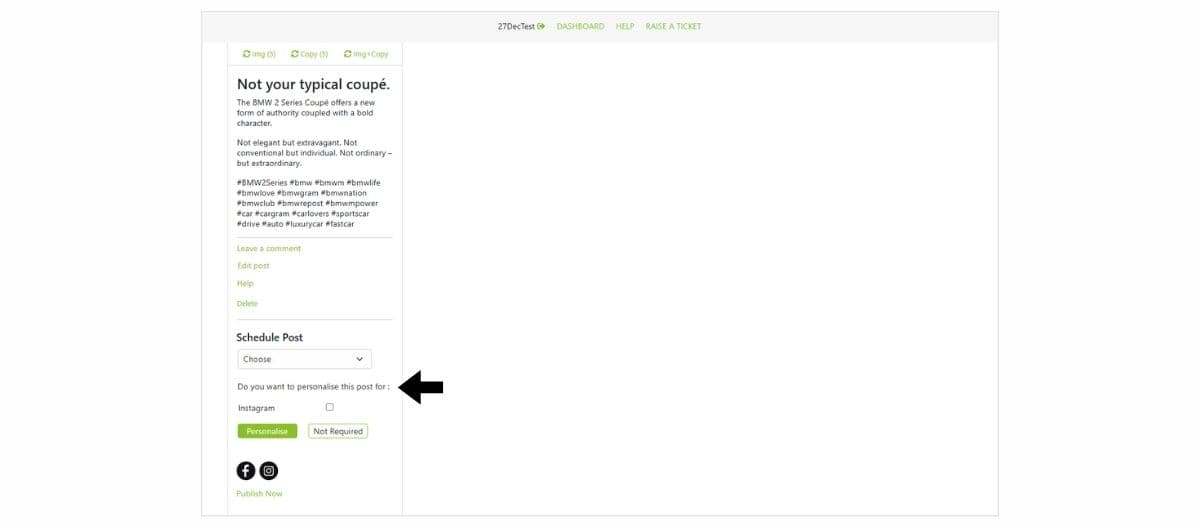
Once you have made your yes/no selections, the platform will (if you have made any ‘yes’ selections) duplicate the social media post for each channel – according to your instructions. These duplicated posts will be shown to the right of the original post.
You can tell that a post is a duplicate because the band at the top of the image – that shows the scheduled date and time for publication – will be grey instead of black. You can also easily determine which post will be going to which channel as each one will show just a single social media icon.
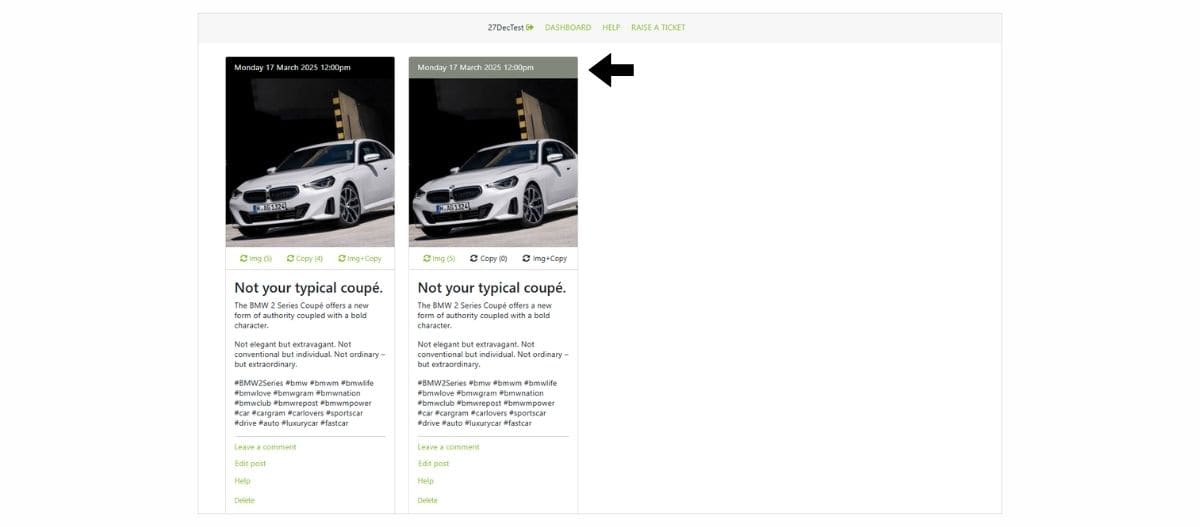
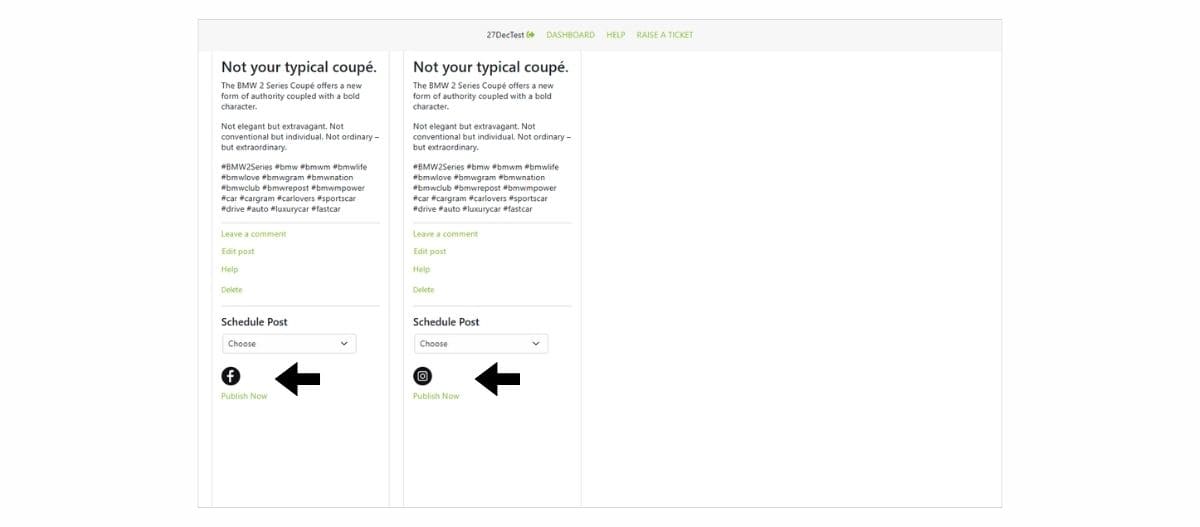
For example:
If a post was generated and scheduled to be published to Facebook, Instagram and LinkedIn, and the user had said when prompted that they wanted to personalise the copy for each channel, they would be presented with the following.
The original post – which would display the Facebook icon.
Duplicate post 1 – which would display the Instagram icon.
And Duplicate post 2 – which would display the LinkedIn icon.
By clicking on the ‘edit’ function of each post, copy edits can be made as required.


Once edits have been made and saved, each post will be automatically scheduled to be published at the date and time set by the user when initially generating the social media post.
If you want to personalise a post AND have these posts published at different times (to the original), be sure to change the post time as required on each post.
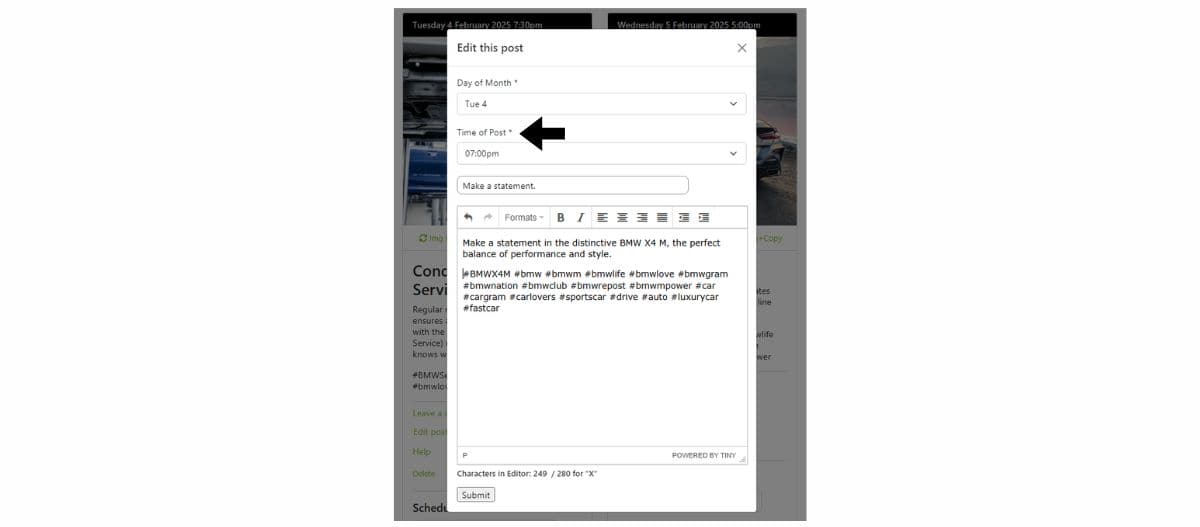
The date, day and time of each post is always shown in each posts header bar.

You can also change the image for each personalised post by using the image refresh functionality.

Need help? Click the Raise a Ticket link in the main navigation bar of your Fetch platform account (visible when logged in), and we’ll respond asap.
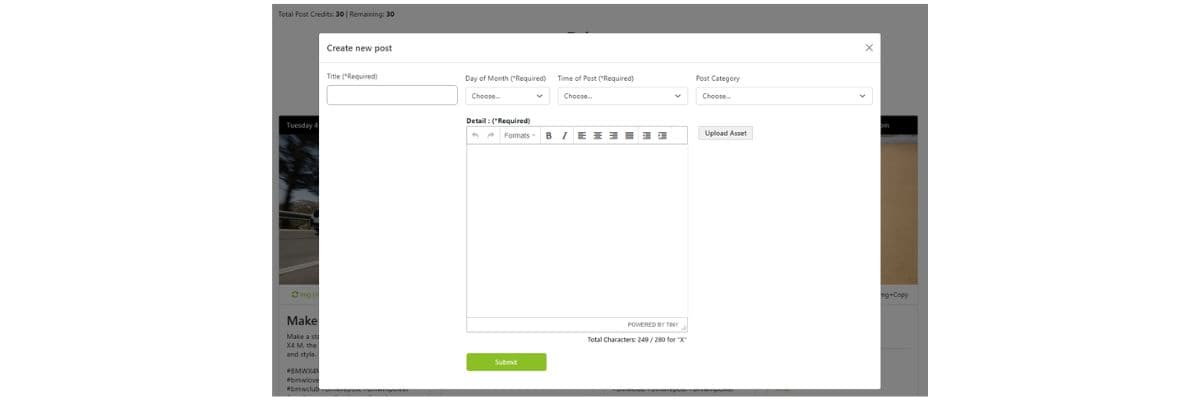
In addition to being able to access more than 1200 pre-written BMW & MINI posts and over 1800 images and videos, our platform also enables you to add in your own social media posts. This functionality is great for when you want to add in some hyper-local content such as a customer car pick-up post, on-site VIP event and much more.
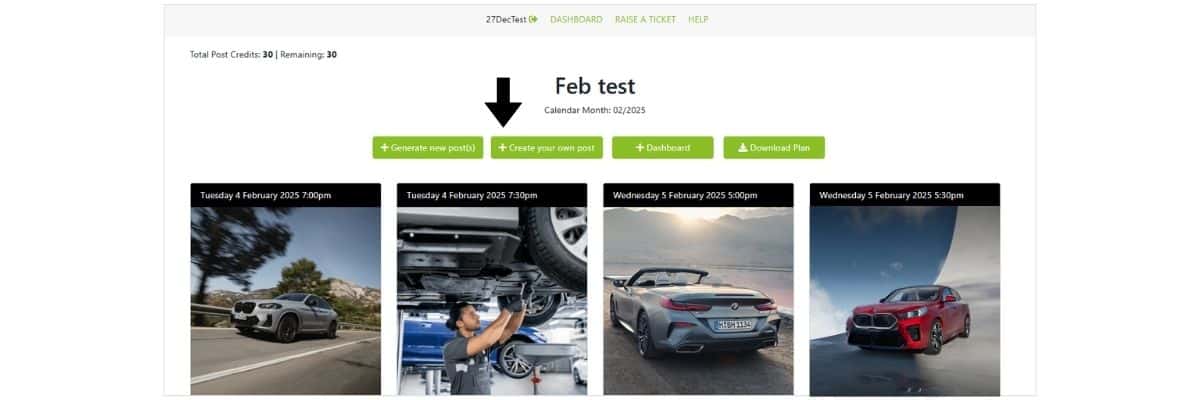
To use this functionality just complete the required drop-down fields, add your copy, upload your asset (image/video) and click the submit button.
Your bespoke post will then be displayed on your social media plan.
Need help? Click the Raise a Ticket link in the main navigation bar of your Fetch platform account (visible when logged in), and we’ll respond asap.
When you use our platform to generate social media posts, each post that is generated comes with the ability for you to do a number of additional adjustments. These adjustment options are shown directly under each posts image.
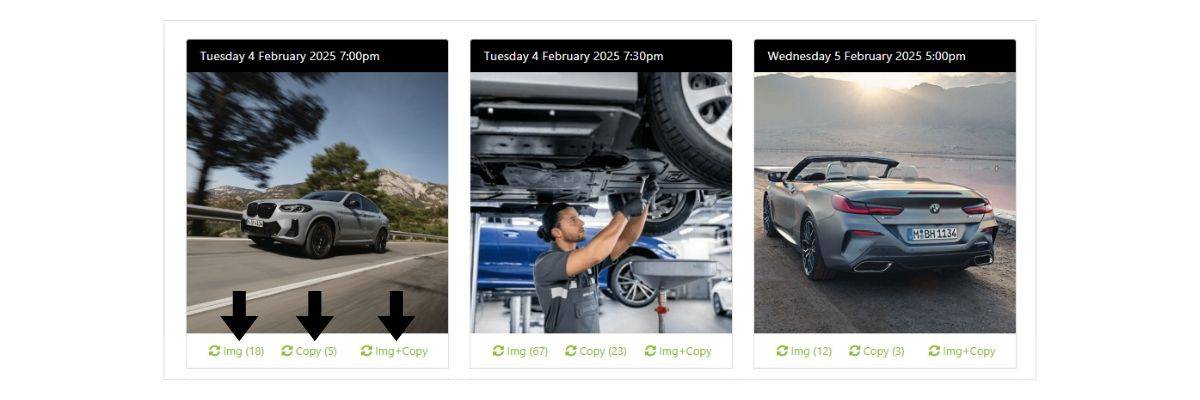
The first option is called ‘Img’ and refers to performing an image refresh – giving you the ability to change the asset (image or video) that has been suggested for you.
If you click on this action you’ll be asked if you want to ‘Refresh’ the current asset or ‘Choose your own’.

By clicking refresh our algorithm will select another asset for you that is aligned to the category of post you have chosen. If you click on ‘Choose your own’ all of the available image and video assets (for the category your post relates to) will be displayed and you will be able to select the one you want to use.
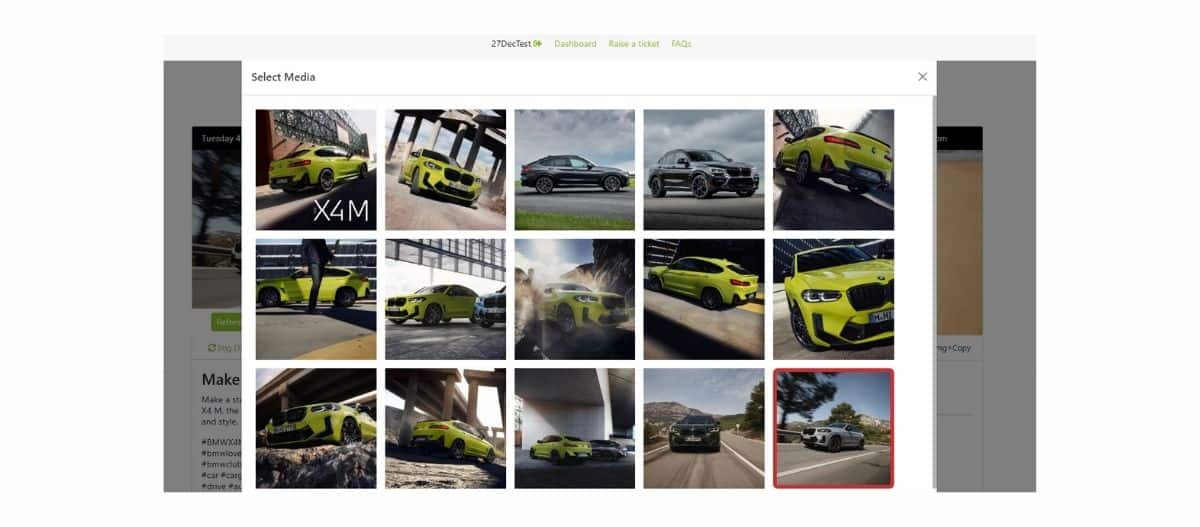 If you select ‘Img’ refresh the asset will change but the suggested post copy will not.
The second option is called ‘Copy’ and refers to performing a refresh of the post copy that has been suggested for you. If you click on this action you’ll be asked if you want to ‘Refresh’ the current copy or ‘Choose your own’.

By clicking refresh our algorithm will automatically select and display a new copy suggestion that is relevant to the category the post relates to. If you click on ‘Choose your own’ all of the available social media posts (for the category your post relates to) will be displayed and you will be able to select the one you want to use.
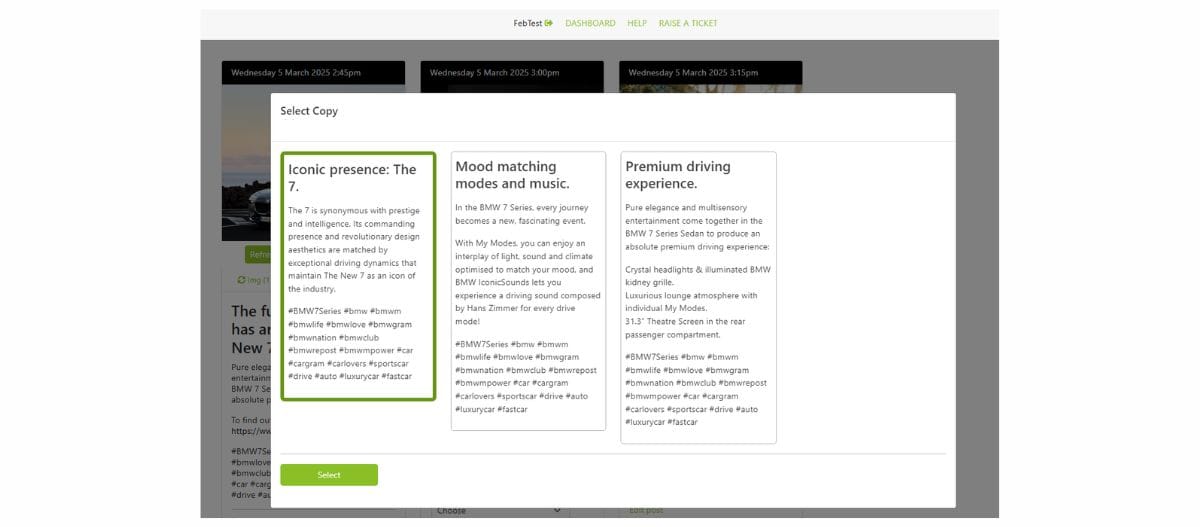
If you change the ‘Copy’ the content of the original post will change but the suggested asset (image/video) will not.
The third option is called ‘Img + Copy’ and refers to performing a refresh of both the suggested asset (image/video) and post copy. By clicking this option our algorithm will select and display a new asset (image/video) and post copy suggestion. Both will be relevant to the category in question.
For options ‘Img’ refresh and ‘Copy’ refresh there will be a number in brackets – for example (8). This refers to the number of alternatives currently available – so for example Img (8) would mean that there are 8 assets currently available and Copy (8) would denote that there are 8 social media posts currently available for the particular topic/category in question.
Need help? Click the Raise a Ticket link in the main navigation bar of your Fetch platform account (visible when logged in), and we’ll respond asap.
When you create your own post on our platform you are essentially loading up your own content and asset (image or video) to the social media plan you are developing. Because all of the information in this type of post is user driven we don’t give you the option to:
- Perform an image refresh – ‘Img’
- Perform a copy refresh – ‘Copy’
- Perform an image and copy refresh – ‘Img + Copy’
Exceptions to the above rule.
When developing your own post(s) if you select an item from the ‘category’ dropdown as part of the form completion and then submit the post to your plan – you will be given the option to perform an image refresh – ‘Img’. See below for further details.
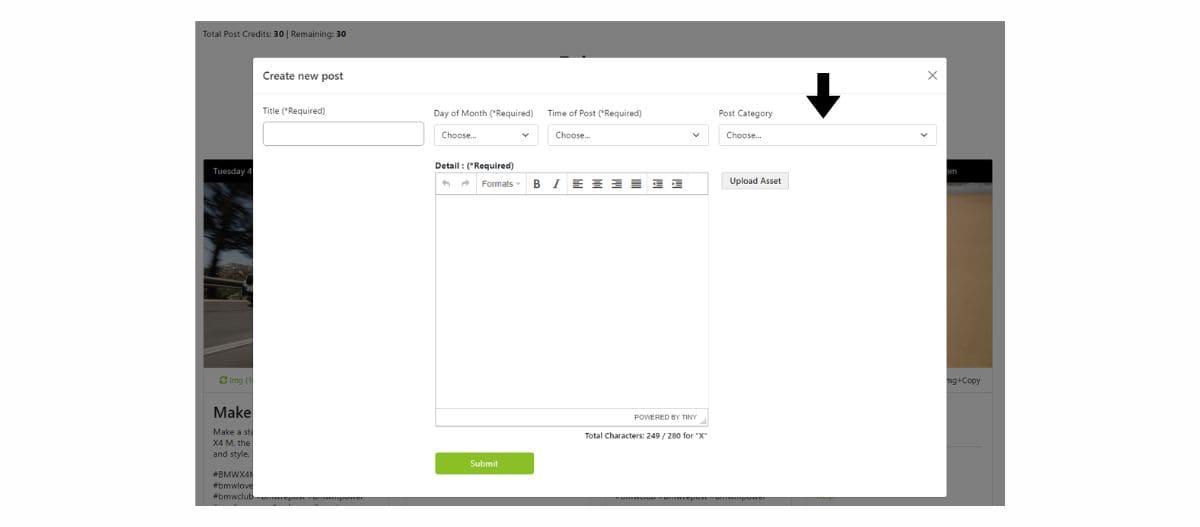
The image refresh ‘Img’ action gives you the ability to change the asset (image or video) associated with your user generated post.
If you click on the ‘Img’ link you’ll be asked if you want to ‘Refresh’ the current asset or ‘Choose your own’. By clicking refresh our algorithm will select another asset for you that is aligned to the category of your user generated post. If you click on ‘Choose your own’ all of the available image and video assets (for the category your post relates to) will be displayed and you will be able to select the one you want to use.
If you select ‘Img’ refresh the asset will change but the suggested post copy will not.
Need help? Click the Raise a Ticket link in the main navigation bar of your Fetch platform account (visible when logged in), and we’ll respond asap.
If you like the social media post that the content generator has suggested for you, but you don’t like the asset suggestion, you can get the platform to choose another asset for you or you can choose your own.
For more information, visit the FAQ titled – What do the following mean – ‘Img’ – ‘Copy’ – ‘Img + Copy’
For information about adding your own social media posts to your plan, visit the FAQ titled – How does the ‘Add your own post’ function work?
Need help? Click the Raise a Ticket link in the main navigation bar of your Fetch platform account (visible when logged in), and we’ll respond asap.
X (formerly Twitter) will currently only accept social media posts that are no longer than 280 characters in length (unless you have paid for a subscription to their verification service). All posts that are longer than this limit will be rejected by X.com.
If the post you wish to publish is longer than 280 characters in length our platform will tell you this and you will need to shorten the copy.
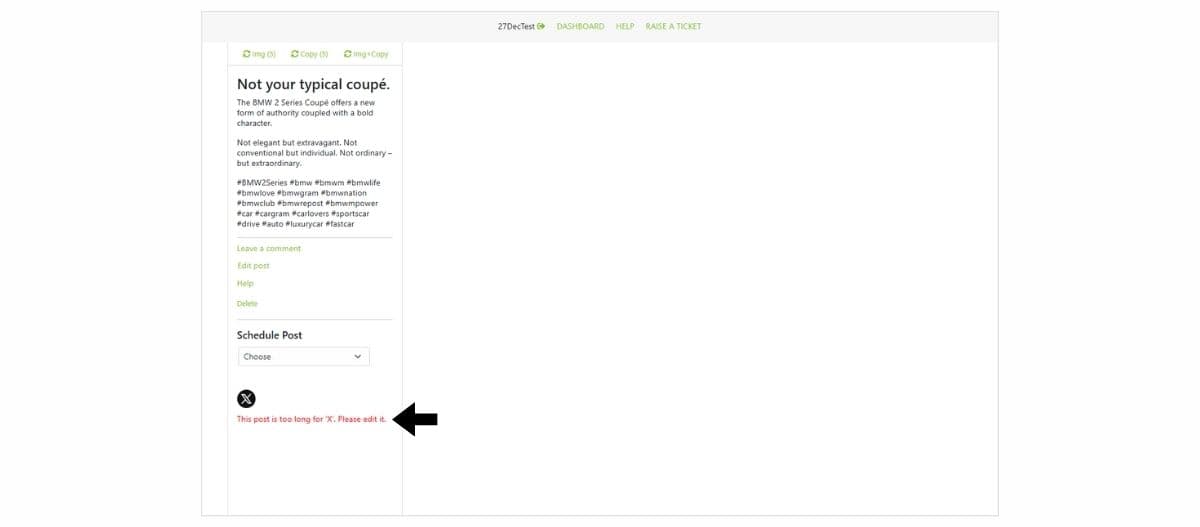
To do this, click on the ‘edit’ link which appears underneath the social media post copy. A window will open which will allow you to make content edits and shorten the post. In the bottom left corner of the content area, you’ll see a character limit counter to help guide you. Once you have edited the post, simply save it, and you’ll be returned to the main plan.

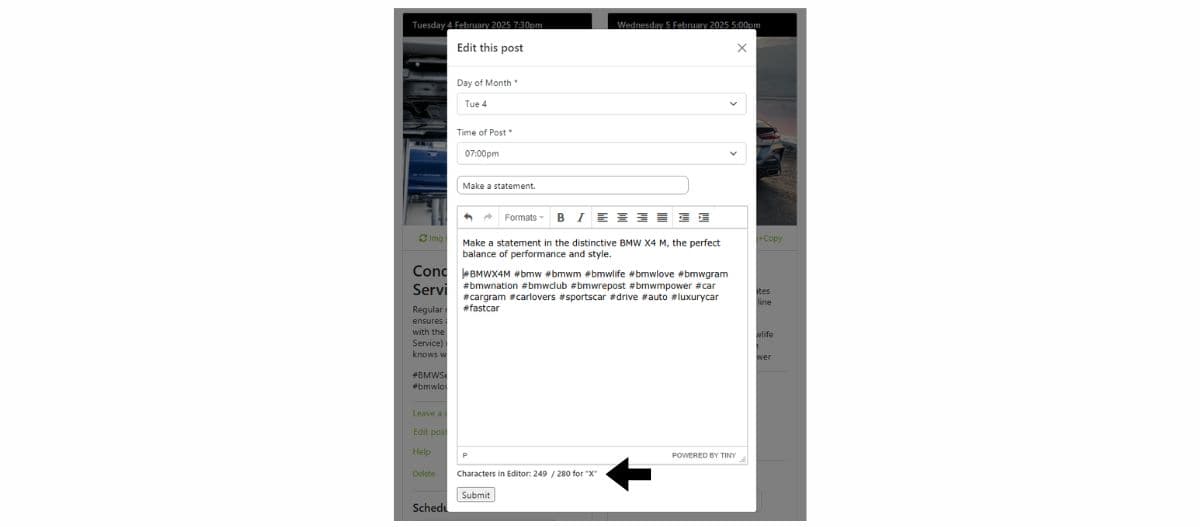
If the post is within X.com’s permitted character count – the site message about the content being to long will have been removed, and your post will be ready to be automatically published on the date and time that you have selected.
Need help? Click the Raise a Ticket link in the main navigation bar of your Fetch platform account (visible when logged in), and we’ll respond asap.
When you create a social media post via the ‘Generate New Post’ functionality the post will appear on the main plan.
 For each post there is a section called ‘Schedule Post’. When you click on the dropdown you will be able to select which social media accounts you want the post in question to be sent to. Simply tick all the boxes that apply.

*Please note: You need to ensure that for each social media channel you want to publish to, you have connected a corresponding social media account to the platform, via the ‘Account Manager’ function.
Once you have made your selections – and decided if you want to personalise the post for each channel you have selected), just click on the green ‘set’ link and your post will be scheduled to be published on the day and time you have already selected.
Once this is done, icon will appear at the bottom of your post and this will represent each channel that the post is set to be delivered to.

Need help? Click the Raise a Ticket link in the main navigation bar of your Fetch platform account (visible when logged in), and we’ll respond asap.
To instantly publish a social media post, follow these steps.
1. Use the ‘generate social media post’ or ‘create your own post’ functions to create your required post content.
2. Select a date and time in the future for the post to be published.
3. When the post appears in your plan, select the social media channels that you want the post to be published to. Once channels have been selected click on the ‘set’ link.
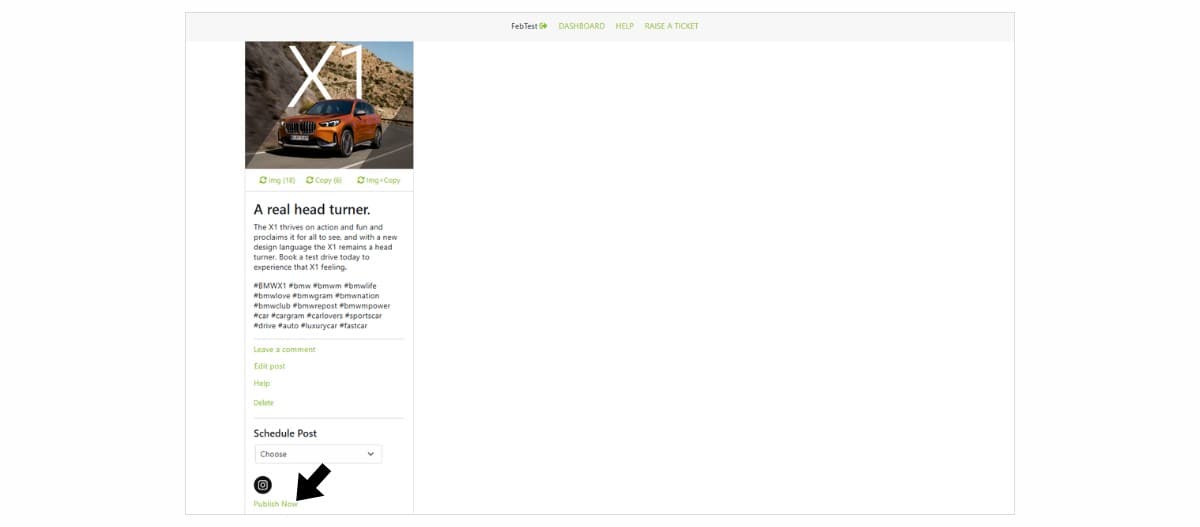
4. Once the ‘set’ link has been clicked you will see icons under your post which will represent which channels the post will be published to. Under these icons will be a link that says ‘Publish Now’. Click this link to instantly publish your post.
5. Once posted, a date and time stamp will appear (for your information).
Need help? Click the Raise a Ticket link in the main navigation bar of your Fetch platform account (visible when logged in), and we’ll respond asap.
When you create and schedule a social media post via the platform, the social media accounts that you have set the post to be published to are shown by the use of icons. These icons are visible at the end of each post, and are shown in black.
When the ‘to be published date and time’ of the post you have created has past, if the post has been successfully delivered to the relevant social media account(s), icon(s) representing that account will go from being black in colour to green.
If the post fails to be published, the icon will turn red, and you will receive further information about the failed post via email.
![]()
Need help? Click the Raise a Ticket link in the main navigation bar of your Fetch platform account (visible when logged in), and we’ll respond asap.
If one of your scheduled social media posts doesn’t publish, you’ll get an email explaining what happened.
You’ll also see the failed post marked in your social media plan with a red icon instead of a green one.
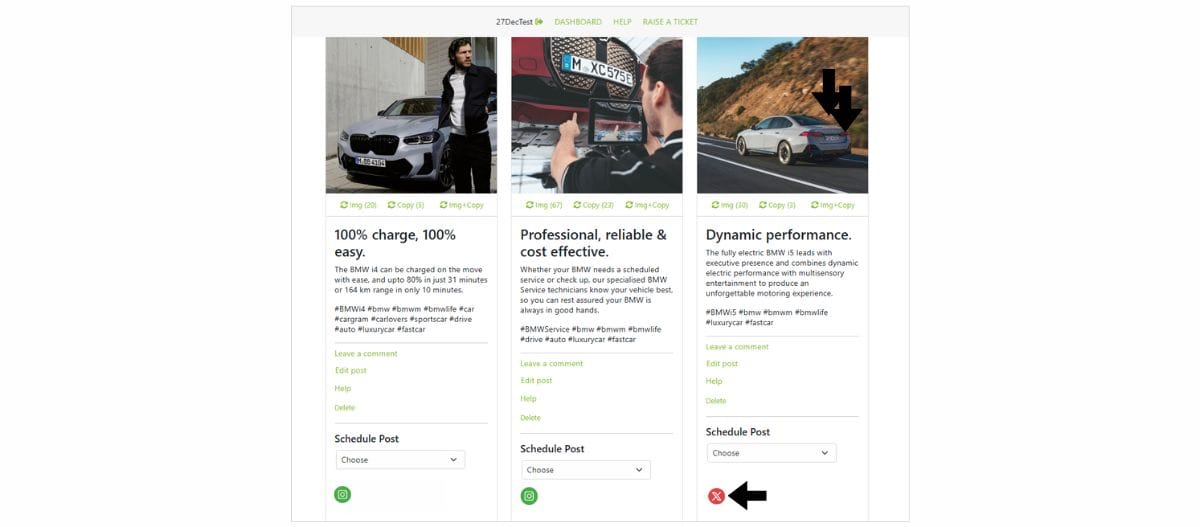
Under the red icon, you’ll see a link called ‘Re-publish now’. Click this to try publishing the post again.
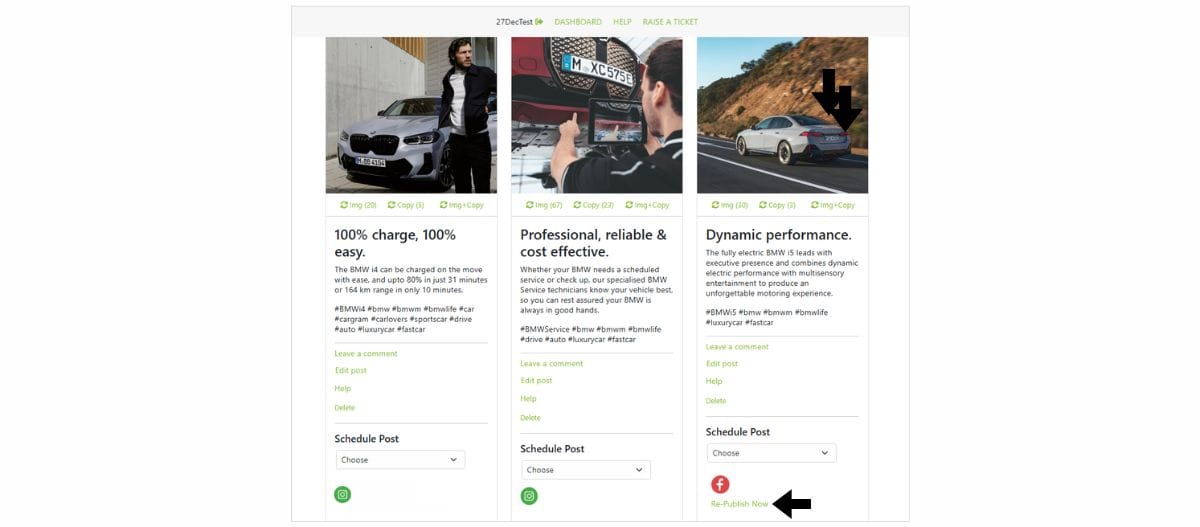
Make sure to also check the Account Manager section of your account to confirm your social media profiles are still properly connected to our platform.
If the failed post is successfully published the red icon will change to green.
If the icon continues to display red. Please either use the ‘Create your own post‘ functionality to try and publish it, or contact us for further assistance using Raise a Ticket link in the main navigation bar of your Fetch platform account (visible when logged in), and we’ll respond asap.
The social media post report is a visual representation of the number of social media posts that have been scheduled and successfully posted to your social media pages. The chart also depicts any posts that have failed to be posted.
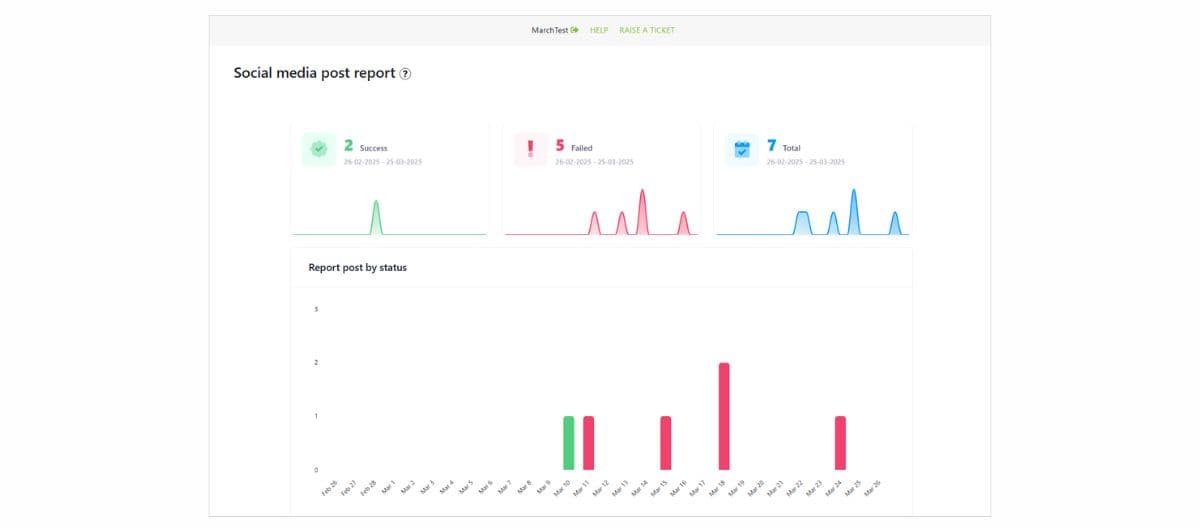
When social media posts fail to be posted you’ll be notified over email. Please see here for more information.
Need help? Click the Raise a Ticket link in the main navigation bar of your Fetch platform account (visible when logged in), and we’ll respond asap.
To download your social media plan simply click on the green button labelled ‘Download plan’.
Once this has been done go to your PC or laptop downloads folder where you will see a zip folder. This zip folder file will have the same title that you have given your social media plan.
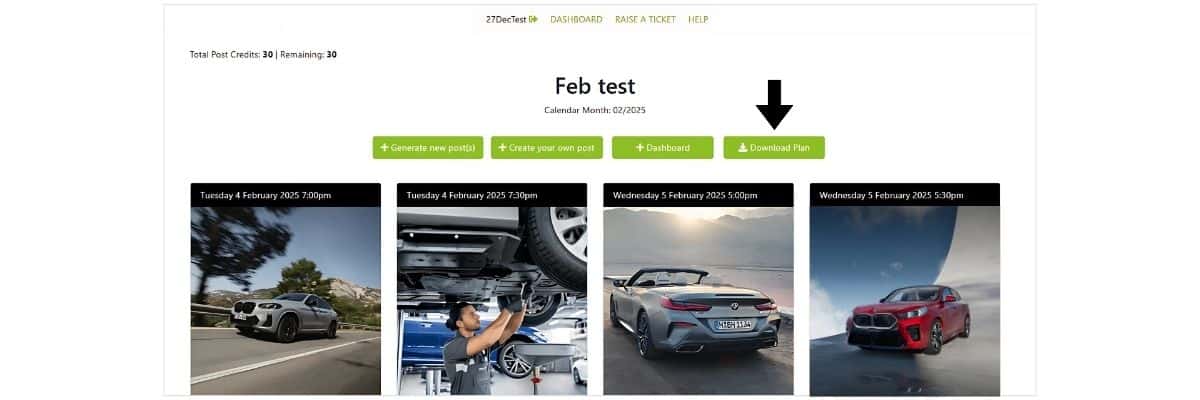
When you open the zip folder you will see an excel spreadsheet file and a folder. The file will have all your plan information in – Day, Date, Time of Post and Copy. The folder will have all the images that relate to your social media plan. Each image file carries a date reference so you can easily match it up to each social media post that is shown in the spreadsheet.
Need help? Click the Raise a Ticket link in the main navigation bar of your Fetch platform account (visible when logged in), and we’ll respond asap.
Sharing any of your social media plans with a team member for their review and comment is simple. Just use the raise a ticket link – located on your accounts main naviagtion (top bar) to request subscriber access, including the following details of the person you want to grant access to:
Full name.
Company name.
Job title.
Email address.
Please allow up to 1 working day for new subscriber accounts to be set-up. You and the subscriber will be notified when the account is live.
Note: Subscribers can view all of your current and past plans and leave comments on all posts that you have in each plan. They are not able to delete plans, or add or remove posts.
When a subscriber comments on a post in one of your plans you will be automatically notified via email.
Need help? Click the Raise a Ticket link in the main navigation bar of your Fetch platform account (visible when logged in), and we’ll respond asap.
For each of the social media posts we make available via our platform we include high performing hashtags.
Social media hashtags serve as powerful tools for enhancing the visibility and engagement of content across ALL social media platforms. By incorporating relevant hashtags, you can significantly expand your posts reach beyond immediate followers, tapping into larger, topic-specific audiences interested in similar subjects. Hashtags act as searchable links, allowing users to discover posts and connect with like-minded brands. This increased exposure not only boosts interaction rates but also fosters community building around shared interests.
Furthermore, hashtags can provide invaluable insights into trending topics and audience preferences, enabling you to further tailor content and participate in broader conversations.
Ultimately whether you include or don’t include hashtags in your posts is up to you. And while we currently don’t have the option to ‘turn-off’ hashtags, you can either use the ‘edit’ function on your posts to remove them, or simply omit the hashtag suggestions before posting to your social media pages.
Need help? Click the Raise a Ticket link in the main navigation bar of your Fetch platform account (visible when logged in), and we’ll respond asap.
All of the assets available via our platform have been sized to 1080×1080 pixels.
The 1080×1080 pixel size is widely recognised as a universal choice for images and videos across all social media platforms for several reasons. Firstly, it adheres to the square format, which is inherently versatile and visually appealing on most social media feeds, ensuring that content looks good regardless of the platform. This size is large enough to maintain high image quality and detail, making it suitable for a wide range of content, from photographs to graphic designs. Additionally, because many platforms like Instagram, Facebook, and X (Twitter) are optimised for this dimension, it allows for a seamless viewing experience without the need for cropping or adjusting the image, ensuring that the audience sees the content exactly as intended.
Need help? Click the Raise a Ticket link in the main navigation bar of your Fetch platform account (visible when logged in), and we’ll respond asap.
Our content generator doesn’t allow multiple users to access the platform at the same time using one set of login details.
If more than one person tries to login to the platform at the same time, all users will be automatically logged out.
Need help? Click the Raise a Ticket link in the main navigation bar of your Fetch platform account (visible when logged in), and we’ll respond asap.
When you sign up for access to our content generator we’ll issue you with a username and password to access the platform. If you wish to change your password, please visit the platform login page and click the link called ‘lost password’. You will then be emailed instructions on how to change (and/or recover your current password). Please note you are not currently able to change your assigned username.
Need help? Click the Raise a Ticket link in the main navigation bar of your Fetch platform account (visible when logged in), and we’ll respond asap.
When you sign up for access to our content generator we’ll issue you with a username and password to access the platform. If you forget your password, please visit the platform login page and click the link called ‘lost password’. You will then be emailed instructions on how to recover (and/or set-up a new password). Please note you are not currently able to change your assigned username.
Need help? Click the Raise a Ticket link in the main navigation bar of your Fetch platform account (visible when logged in), and we’ll respond asap.
Cancelling your subscription is easy. Simply use the raise a ticket link to let us know you want to cancel and we will ensure that cancellation takes place on the day of the request.
We don’t offer partial refunds so your account will remain active until the end of the current billing cycle and then it will be removed from our systems.
Need help? Click the Raise a Ticket link in the main navigation bar of your Fetch platform account (visible when logged in), and we’ll respond asap.
You can view our Terms of Use policy at anytime by clicking here.
Need help? Click the Raise a Ticket link in the main navigation bar of your Fetch platform account (visible when logged in), and we’ll respond asap.
You can view our Privacy Policy at anytime by clicking here.
Need help? Click the Raise a Ticket link in the main navigation bar of your Fetch platform account (visible when logged in), and we’ll respond asap.
Our platform is committed to continuous growth and improvement, guided by a clear and dynamic roadmap that outlines our development journey. We actively encourage our users to visit our roadmap page to gain insights into our upcoming features and enhancements.
Your feedback and suggestions are invaluable to us; they play a crucial role in shaping the future of our platform. By sharing your ideas, you become a part of our development process, helping us to better align our goals with your needs and expectations. Visit our roadmap page today to see what’s ahead and leave your mark on our platforms development.
Need help? Click the Raise a Ticket link in the main navigation bar of your Fetch platform account (visible when logged in), and we’ll respond asap.
If you require more assistance, please contact us using this form.